Tag: holiday clean up

Cleaning your house after the Holiday Season

What’s your official day to do your holiday cleanup? I’m sure your answer really depends on when you put your decorations up.  A good rule of thumb is January 6, which is known as “little Christmas.” Personally, I’m feeling pretty good if I get my decorations down by Valentine’s Day! It really doesn’t matter what day you choose as long as you take them down and put them away so they are organized for next year. Once the decorations are down and stored, we can then focus on the cleaning.

Organizing your Christmas decorations

  • You can choose to put your decorations away by room or by item. I like to store all my window and outside lights together as they are the first I’ll want to get out next year. Store all the decorations for each tree together so that you know which decorations go with which tree. Use clear storage tubs so you can see what’s inside.
  • Labeling is very important. Make sure you list everything inside each storage tub so you don’t have to dig through everything again the following year.
  • Make a fun date with yourself (and your family) to take down the decorations. Set aside a specific block of time so you keep focused. Trying to take down decorations in between cooking dinner and folding laundry probably won’t work - you’ll end up frustrated next Christmas when you realize nothing was put away correctly.

Stains and cleanup problems

Christmas has its own set of cleaning problems. Below are some tricks on how to deal with them.

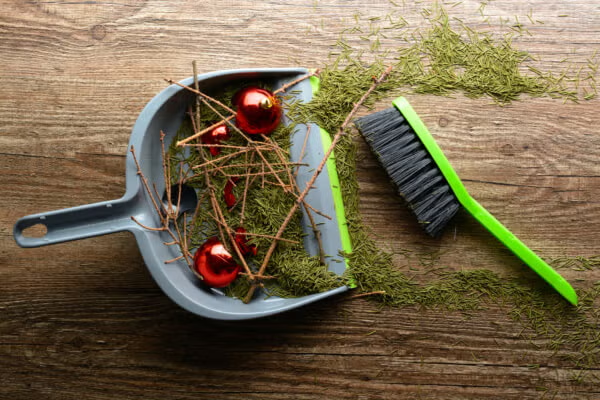
Pine pitch - If you had a real Christmas tree you may have some sticky pine pitch on your carpeting or hardwood floors. Once evergreen trees come inside a home and warm up, the sap inside the tree branches drips out of the trimmed limbs. This is called pine pitch and it can be very hard to remove. To remove it, you’ll want to start by rubbing the area with an ice cube to freeze the sap. Scrape as much of the sap off of the flooring as you can, then use a clean cloth dampened with rubbing alcohol to dab the area until the pitch is removed from the floor.

Water stains - You may have some water stains from the tree stand overflowing. This stain can be removed by using vinegar. Pour vinegar into a spray bottle and liberally spray the entire area. Let it sit without scrubbing. After 30 minutes dab the area with a paper towel and repeat the process until the stain disappears.

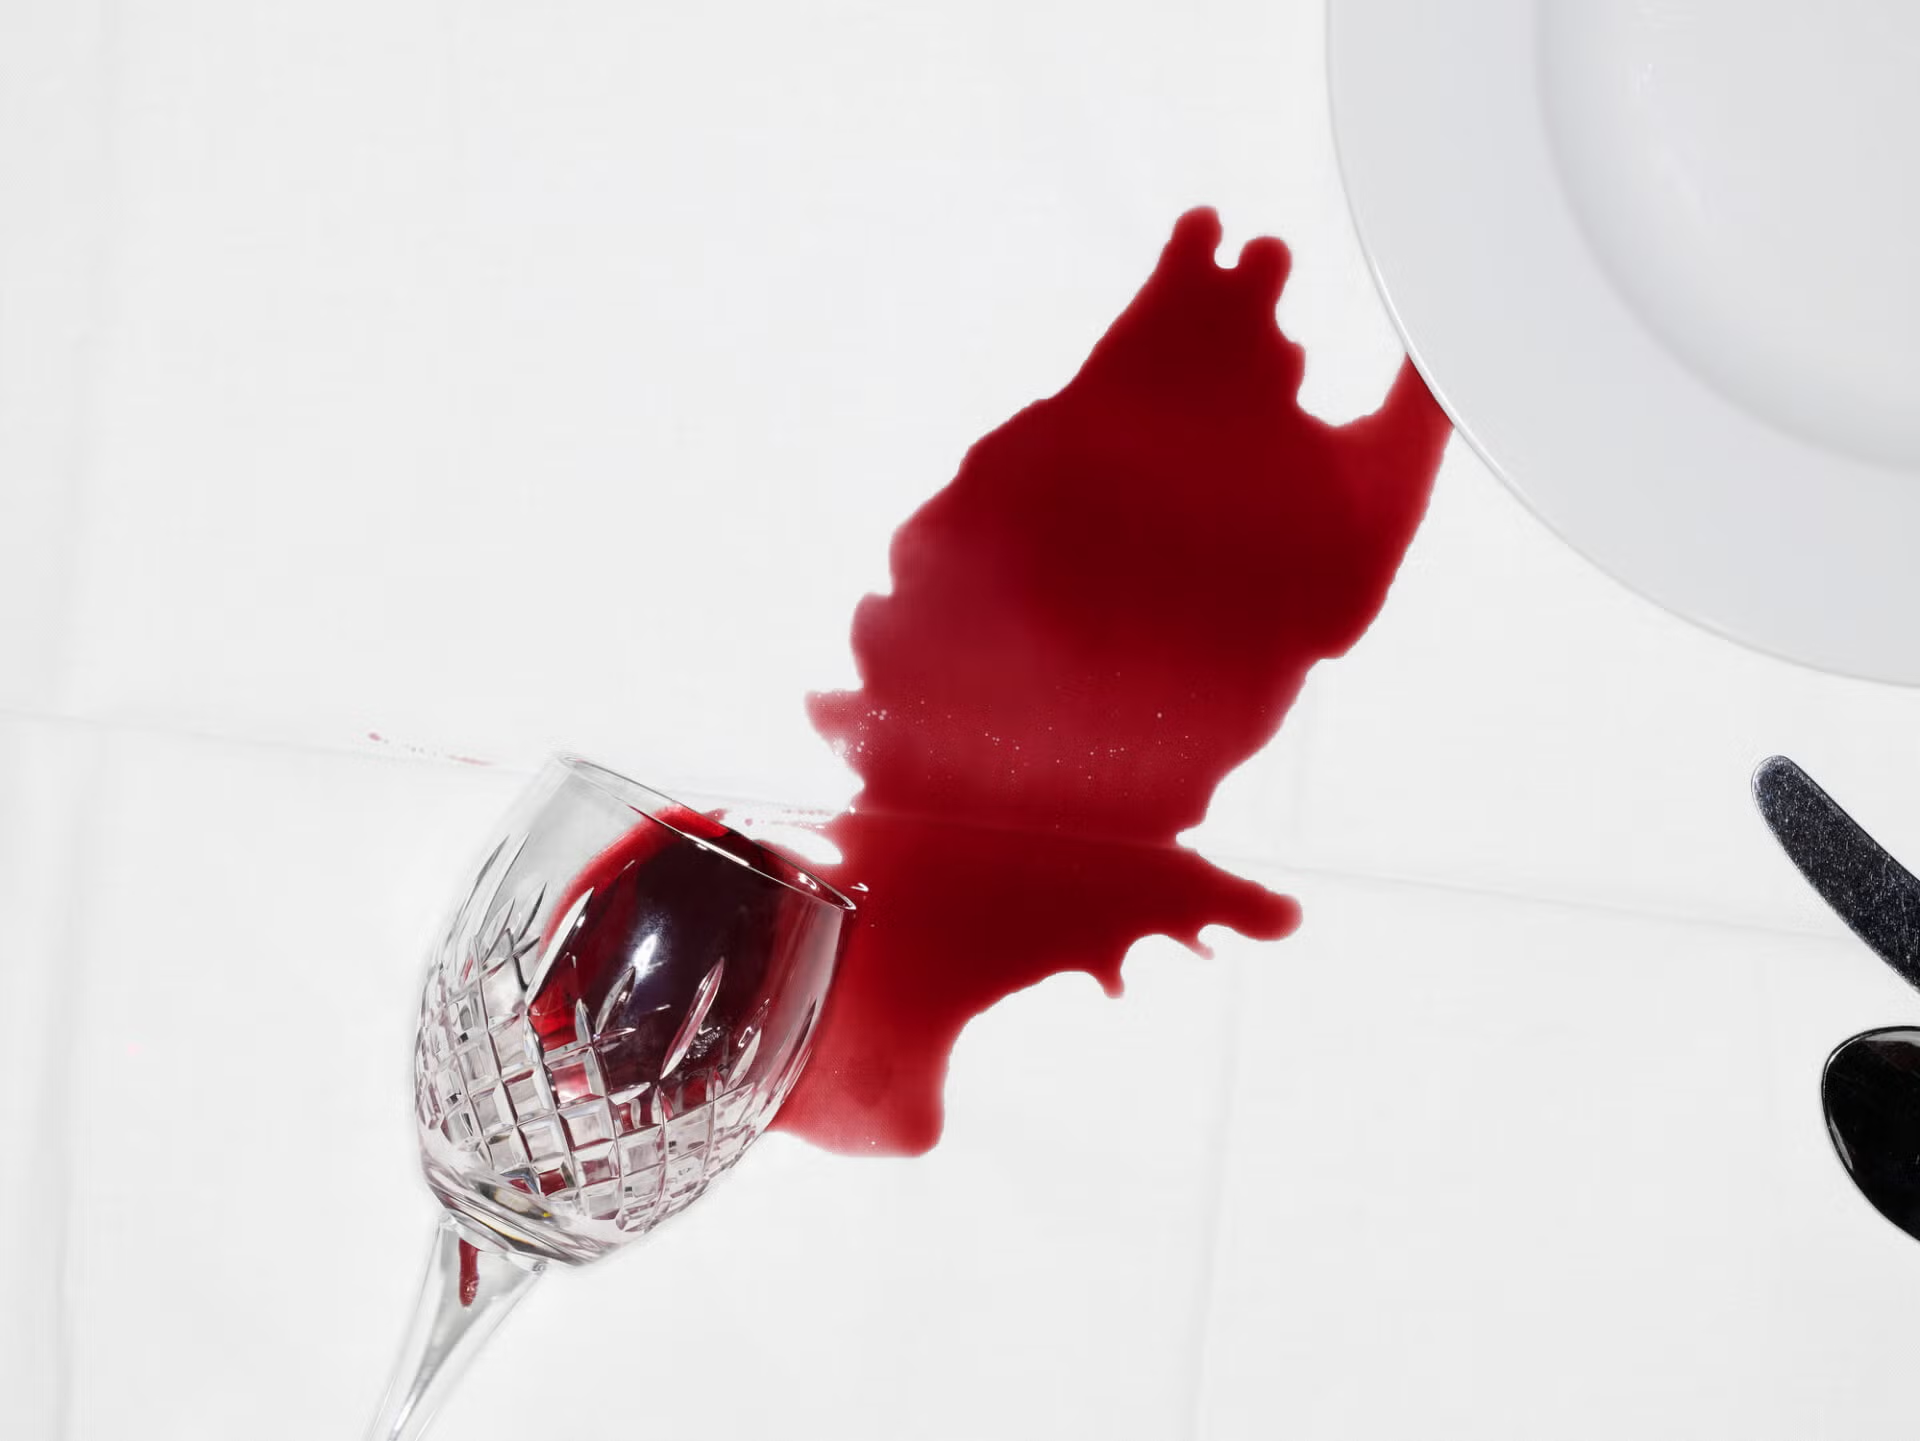
Table Linen stains - Don’t put your table linens away until you know they are completely clean and stain free. You can use rubbing alcohol on greasy stains and oxygen bleach for food spots. Once the linens are clean and dry, press them and then wrap them in tissue paper and store them in an airtight container.

Window sill spots – If you have discovered the trick of using white athletic tape to hold your Christmas window lights in place you also are dealing with the adhesive residue left when you remove it. An easy remedy is to scrape off as much of the adhesive as you can with a putty knife. Dampen the area with rubbing alcohol, which works to break down the adhesive. Place a drop of dish detergent over the area and work it into the residue. Wipe the window sill with warm water and a microfiber cloth.

Floors – Your floors will have taken a beating over the holidays between decorations, guests and all the cooking and baking. Plan to give each hard floor a good scrubbing on your hands and knees if you can. Start by moving all your furniture away from the walls and vacuuming the floor and the wood trim around the room. Use a bucket of hot water with a drop of dish soap and use a microfiber cloth to clean your way around the room. Once the outside of the room is dry, move your furniture from the middle of the room to the edges and wash the middle area. Once the floor is completely dry, you can replace area rugs and reset the furniture.

Guest room sheets – Strip all the beds and wash them in hot water. Add a touch of oxygen bleach to clean and disinfect them. Dry them on high heat to kill dust mites and other allergens. While the sheets are in the dryer, use an upholstery tool to vacuum the mattress and the sides of the box springs.  Wipe down the bed frame and remake the bed as soon as the sheets are dry. A simple trick to remove wrinkles in the sheets is to spray them with witch hazel after they are on the bed. You can add a few drops of an essential oil to create a fragrant linen spray.

Holiday stain guide

Holiday stains are like little presents no one intended to give you. But don’t stress, we’ve got a stain guide that will help you get through the holidays - stress and stain free. Download it free, then post it in your laundry room so it will be at your fingertips if there's a fumble.

download-holiday-stain-guide

Happy Holidays, from Maid Brigade!


This infographic was created in collaboration with Leslie Reichert, our DIY green cleaning expert. To read more from Leslie, visit greencleaningcoach.com.

How to deep clean the guest room

Preparing for holiday visitors forces us to address chores and projects we kept postponing when the weather was warmer and the days were longer. Even during this busy time of year, it's possible to get things checked off “the list” whether routine maintenance or improvement project. But it’s important to start early, so it can all happen before the big day your holiday guests arrive. Like the guest room. Deep cleaning the guest room ahead of time will relieve stress as you get closer to their arrival.

Deep cleaning the guest room may take a few hours but if you divide it into small 15 minute jobs, it that can be something that you can work on throughout the week. Find a timer or use a smart phone to keep track of how long you are cleaning.  My motto is:” I can do anything for fifteen minutes”.

Methodical deep cleaning will make the process go quickly and efficiently. This generally means to start at the ceiling and finishing with the floor, moving around the room clockwise, to make sure you cover every spot and cover it only once. Although there are some exceptions to this rule (see below).

Step 1: LIGHTS – Start with cleaning the lighting fixtures.  Remove the covers of ceiling and wall fixtures, taking ample safety precautions if using a step ladder. For light to medium dust, clean the fixture in the dishwasher. If the fixture has a thick coat of dust, fill up the sink with warm soapy water and give it a good scrub by hand. Ceiling fans can be easily cleaned with an old pillowcase. With the pillow case and a damp microfiber cloth, climb the step ladder, place the pillowcase over the dusty fan paddle and pull the dust off and into the pillowcase. Repeat this process on each of the paddles.

deep-clean-the-guest-room

Follow by dusting each blade with the microfiber cloth to make sure any remaining residue is gone. After you have safely descended the ladder, take the pillowcase outside, turn it inside out and shake out the dust. Launder the pillowcase with soiled cleaning cloths and store with clean cloths so it will always be handy.

Step 2: WALLS – Instead of washing the walls use a microfiber mop and dust them.  Use a microfiber mop cover and a spray bottle of water. My favorite microfiber mop is called a Duop Mop has a ball joint that easily clean large open areas with just a wipe. Place the dry microfiber mop cover on the mop and spritz it lightly with water (never spritz water or cleaner directly on your walls or you may permanently spot them). Start at the base of the wall and clean up to the ceiling (walls are the one area where you will clean bottom to top to prevent staining them). Then wipe the dry mop head over the ceiling to collect cobwebs and dust.

Step 3: WOODWORK – Use a damp microfiber cloth to wash woodwork and baseboards. Start with the tops of door jams and windows, follow with the trim around the windows, ledges and sills and finish with the baseboards and toe molding. Don’t worry about smearing the glass on the windows, you will clean windows in a latter step.

Step 4: WINDOW TREATMENTS – Remove drapes and place them in the dryer to remove dust. Don’t bother placing them in the washer.  If they have a thick layer of dust, put a damp towel in the dryer with the curtains. This will remove the dust and leave them wrinkle free.

ow-to-dust-window-blinds


Dust blinds by fulling closing them, wiping horizontally (with the blind slats) from top to bottom with a dampened microfiber cloth. Then, reverse the direction of the slats to the opposite fully closed position and completely dust this side in the same pattern.

dusting-blinds

Step 5: WINDOWS – Using a fine woven microfiber cloth and a bucket of hot water, clean the glass on the windows - inside and out. You want your windows to be crystal clear when your guests wake in the morning.

Step 6: BED LINENS – Strip the bed and place the bedspread, comforter and pillows in the dryer on a high heat. This will remove dust and also kill dust mites. This is a perfect solution for those guests that could have dust and dust mite allergies. Wash all the sheets using a fragrance free laundry soap. Your guests may be sensitive to fragrances, so using a simple soap to clean the sheets will let them have a peaceful night’s sleep.

Step 7: DUSTING – Dust all the furniture with a damp microfiber cloth. Move the furniture away from the walls and clean behind and underneath them. Using a crevice tool on the vacuum, remove built up dust in the tight spots where the carpet meets the wall.  Use the soft upholstery brush to clean the outside edges of hardwood floors.

Step 8: FLOORS – Vacuum carpets by starting in the farthest spot and gradually working your way out of the room. Use the vacuum’s pattern to make sure you have covered every inch of carpet. Hardwood floors can be cleaned with the Duop Mop. Start with a damp mop head and a spray bottle of a gentle hardwood floor cleaner. Use my “bucketless mopping” technique, spraying and mopping as you go, for fuss-free floors that look like glass.

Step 9: COMFORT BASICS – Help your guests feel at home by attending to basic needs. Like placing bottled water on their night stand.  Make sure the room has an alarm clock set to the current time. Add a luggage rack or ottoman so suitcase contents are most accessible. Leave a charging cube in a convenient outlet so guests can power devices overnight.

deep-clean-the-guest-room-for-holidays

Step 10: COMFORT EXTRAS – Purchase a few new magazines on subjects they find interesting and array them on the dresser. Place some fresh flowers and some hard candies on the dresser so guests will feel like they are staying in a 5-star hotel.

Post-holiday cleanup: LATER is NOW

holiday-clean-up

Oosouji is the Japanese tradition of cleaning up and getting ready for the new year.  When translated it means the “big clean”.  The Japanese actually spend their New Year’s Eve cleaning their home to get it ready for the incoming new year. (These are people after my own heart.)

Let’s do an American version of oosouji for our homes.  Nothing feels better than getting a fresh start into the new year.

Deal with your presents

The holidays are over so it’s time to put your presents where they belong. If you got something you really didn’t need or want, take it back and return it for something you really do need. There’s no point in keeping something you don’t want.

Holiday cards

Go through your holiday cards and create a spreadsheet so you can keep a record about who sent you a card and their addresses. Don’t bother with an address book as it will just create clutter. Instead keep a digital copy you can access it from your computer or phone.

Back to the guest room

In our 20-day countdown to clean we started with the guest bedroom, getting it clean and ready for our guests.  Now time to start there again and clean it really well. Remove and launder the sheets so they are lovely and fresh. Putting the pillows in the dryer on a high heat will disinfect them. Also disinfect areas that could contain germs like light switches and door knobs.  Your next guests will appreciate your thoughtfulness.

Christmas ornament storage box

Organize your Christmas ornaments

Taking down the tree needs to be done with care because throwing all the ornaments into a box will just create a terrible mess. Instead, remove any wire ornament hangers and store them in a zip lock bag. Separate the breakable ornaments, pack them with tissue paper and store them in specialty ornament boxes.  Wrap the lights around a piece of cardboard or the cardboard tube from an empty paper towel or wrapping paper roll.  Then seal everything in an airtight container with a clear label.

Clean out the refrigerator

It’s time to deal with all those party leftovers in the frig, so grab the garbage can and start tossing.  Take time to check expiration dates on bottles and condiments too.  Wipe the shelves with warm soapy water and a microfiber cloth. Rinse them with hot water and start restocking.

Spot clean your spots

In the busyness of the holidays, things get spilled and left to be dealt with later. Later is NOW.  You can spot clean carpets and fabric furniture with some club soda and a microfiber cloth.  Sprinkle a few drops onto the microfiber and work the club soda into the spot. Let the area air dry and repeat the process if any of the stain remains.

holiday-clean-up-dishes

Check your china and crystal for chips and cracks

Before you put your china and crystal away, make sure you check the rims and edges for chips and cracks.  You don’t want to discover at your next event that some of your beautiful crystal was chipped during the holidays. You can try filing a small chip down by yourself with a specialized tool or even a nail file. There are a number of professional companies that will grind the entire rim so that the chip is unnoticeable.  If it’s a quality piece, sending it away is definitely worth the cost.

Launder the linens

All your linens need to be check for spots, laundered and ironed so they are ready for your next event.  The usual spots you will find on linen napkins are red wine and lipstick.  Lipstick can be treated with rubbing alcohol and red wine will disappear with hydrogen peroxide. Treat the napkins before placing them in the laundry. Check them before you place them in the dryer – if any stains remain, re-treat and re-launder.  Do NOT dry them until you know the stain is totally gone.

Holiday Stain Removal Primer

holiday-stain-primer

Along with the season's cheer come some nasty holiday stains.  Whether it’s a tiny spill on a guest’s new dress or an oily mess on your heirloom table cloth, having the basics at hand will help you get through the holiday stain season. Read this now and add any stain removal items on your last grocery list before the holidays.

gravy-stain

Gravy

When gravy spills on a tablecloth, use a touch of corn starch to absorb the moisture.  The corn starch will get thick and will lift off with a spatula.  Since gravy is oil based, pre-treat the stain with rubbing alcohol or vodka. Don’t dump the alcohol on the stained area as that will just make it bleed into the surrounding fabric. Instead, put some alcohol in a spray bottle and lightly mist the area. Then dab it with a clean white cloth. Continue that process until the cloth comes away clean.  Keep the area moist until you are ready to put it in the washer. Use a simple bar soap, like Ivory, and rub the soap into the stain. Then place the table cloth in the washer. Once it’s completed the cycle, check the area to see if the stain is visible. If so, repeat the entire treatment with the alcohol and soap. Don't place the tablecloth into the dryer until you know the stain has been completely removed.

menorah-candle-wax

Candle wax

Even dripless candles can drip onto your favorite table cloth. But don’t worry, here’s an easy stain removal solution. After your guests have left, place the table cloth in the freezer to harden the wax.  Once the wax is frozen, remove the tablecloth and scrape off the wax with a dull knife. There will be a waxy residue left down inside the fabric. Using a clean face cloth and a hot iron, you are going to pull the excess wax out of the fabric. Place the cloth over the waxy area and heat it with the iron. Don’t remove the facecloth until it’s completely cool. Once the cloth is cool lift it up and the wax will be attached to the facecloth. Repeat this process a few more times until you feel the wax has been removed. Then treat the area with rubbing alcohol to remove the oily buildup. Rub the area with a simple bar soap and scrub with a stiff brush. Place the tablecloth in the washer with a grease cutting detergent. Check the stained area when it’s done and repeat the process if there are signs of the stain.  You can let the tablecloth air dry to see if the stain is totally removed.

chocolate-stain

Chocolate

Treat hard chocolate stains as if they were candle wax. Freeze to harden, then use a stiff brush or knife to remove as much as possible. Finally, treat it with rubbing alcohol and bar soap.  For chocolate syrup, dab off as much as you can with a clean dry cloth. Once the cloth comes off without any chocolate on it, pretreat the area with hydrogen peroxide.  Place the hydrogen peroxide on the cloth and continue to dab until the stain looks like it’s starting to break up. Let the hydrogen peroxide sit on the stain for a few minutes. Then use a bar soap and work it into the chocolate stain with a toothbrush.  Continue to hand wash and rinse until the stain is gone.

red-wine-stain

Red Wine

There are a few quick treatments to have on hand when entertaining, because you know someone is definitely going to spill some red wine.  Immediately after a spill, spray the stain with club soda and cover the area with salt. The salt will start to absorb the wine. Once the guests are gone brush off the salt and dab the area until the cloth comes away clean. Then treat the area with hydrogen peroxide. Be patient – it takes the hydrogen peroxide awhile to work, but you will see the stain disappear before your eyes.  Alternatively, soak the fabric in warm (not hot) water and hydrogen peroxide until the stain is gone. Air dry the item to make sure the stain is completely gone. Repeat this stain removal procedure until the stain is entirely gone.

Mystery stain

Suppose your friend has a spot on her new dress and isn’t sure what it could be.  In this case use a neutral treatment to prevent setting the stain. Put a spray nozzle in a bottle of club soda and lightly spray the area. Magically, the stain will be completely gone once the area is dry. This trick also works with mystery stains on your carpet. Just lightly mist the area and dab it with a clean cloth. Once it’s dry the stain will be gone.


Knowing these foolproof cleaning tips for removing stains, you’ll be able to truly mean it when you reassure the friend who spills her wine during the celebratory toast, “No problem.”

Week 2 of the Holiday Cleaning Countdown

20-Day Challenge: Week 2

The Dining Room

holiday-cleaning-countdown-20-day-challenge

(Scroll to the bottom for links to other blogs in this Countdown Series, including a printable checklist.)

The focus for our Holiday Cleaning Countdown is the three rooms you’ll use most when entertaining during the holidays. And this week the focus is the dining room. With one task per day, you’ll spend 7 days on this room, but once completed it will stay fairly clean until the holidays. A quick touch-up is all you’ll need before guests arrive – do this when you place your floral centerpiece to whisk away any petals, berries or needles that stray from the holiday arrangement.

This week our holiday cleaning checklist calls primarily on one tool to get this room ready: microfiber. So gather all your microfiber cloths and mop heads along with your microfiber mop.  Microfiber lets you deep clean quickly, without harsh chemicals or any mess.

Below are all the tasks for Week 2 of the Holiday Cleaning Countdown:

DAY 7: Walls - Start by removing the dust and cobwebs from your walls. But instead of washing them like our mothers used to, use the microfiber mop and a spray bottle of water to do the same job.  Start with a clean, large looped microfiber mop head and a spray bottle of plain clean water. Spritz the mop head so that it just has a light film of water on it. Start at the baseboard of the wall and by using a Z pattern, work your way up to the ceiling. Work one vertical section at a time, always starting at the baseboard and working up. The damp microfiber mop head will catch and remove dust and dirt that was on the wall.  This process will also catch cobwebs that may be hard to see with the naked eye.  If your walls are extremely dirty, change the mop head often!  Also change the mop head when it gets too damp.

holiday-cleaning-tip-chandeliers

DAY 8; Light Fixtures - When cleaning your light fixtures, let your dishwasher to help! Place then glass globes on the top shelf of your dishwasher and wash them with a normal cycle. Then, give them a touchup with a blue fine woven microfiber cloth when they come out, just to remove any spots or drips. Hand wash smaller glass pieces with dishwashing liquid. Dry with a microfiber cloth.

DAY 9: Dusting - When dusting the furniture use a fresh, lightly dampened microfiber cloth. Normally, water is all you’ll need on the cloth. But, if your furniture is looking a little drab or cloudy, you may want to use a polishing mixture of 1 tbs. mayonnaise and 1 tbs. olive oil.  Mix these two ingredients together and apply a light coating on the flat surfaces of your furniture. Let it sit for a minute then buff off with a dry microfiber cloth. Check out our video:

DAY 10: Serving Pieces - Use your dishwasher to clean all the dishes and serving pieces you expect to use during the holidays. This ensures everything will be clean and dust free before serving your guests.  Be sure to include your crystal and silver. If you silver is tarnished, set it aside for DAY 12.

DAY 11: Linens - Make sure to launder and iron the tablecloths and napkins you plan to use for your holiday event.  Check for spots and stains on each piece. Use some hydrogen peroxide to remove dark spots and rubbing alcohol for greasy stains.  Air dry the treated cloth in the washing machine. If the stain has not disappeared repeat the treatment, then launder. If the stain persists, invest in a new tablecloth or set of napkins.

holiday-cleaning-tip-silverware

DAY 12: Silver – Safely polish tarnished silver with some old-fashioned paste toothpaste and a soft cloth.  If you’re pressed for time try placing your silverware in a deep dish lined with aluminum foil.  Fill the dish with distilled white vinegar then place the silver on the foil. The tarnish will “jump” off the silver and onto the foil. The, wash the silver as you normally would. It’s not as effective as polishing but you’ll notice a difference.

DAY 13: Floors – Your final task on this week’s holiday cleaning checklist is to vacuum rugs and vacuum or wash hard wood floors so they look ready for your company. Make sure your baseboards are wiped clean and are dust free.  Spot clean the woodwork as needed. Once the floors are clean, you can keep touching them up during your weekly cleaning.

holiday-cleaning-tips-linens

And now there’s just seven days left in the Holiday Cleaning Countdown, and seven days before you can celebrate the wonder of the holidays and rejoice with your guests.

Check back next week for a detailed description of the Week 3 tasks!

If you missed our other posts in the Holiday Cleaning Countdown series, please click on these links:

https://maidbrigade.com/blog/holiday-clean-up-20-day-challenge
https://maidbrigade.com/blog/20-day-challenge-holiday-clean-up-day-1

20-Day Challenge: Holiday Clean Up - DAY 1

holiday-clean-up-guest bedroom

To help prepare you for the holidays, we've collected some expert advice from our guest bloggers to share throughout December. Be sure to check out our 20 Day Challenge on holiday cleaning and getting your home ready for the holidays. If you plan to host overnight guests, we recommend you download the Holiday Clean-Up 20-Day Challenge PDF guide below, because the first 6 days focus on the Guest Room. READ ON, for cleaning tips and details on preparing the most critical part of this room, the guest bed.

holiday-clean-up-20-day-challenge

Day 1: Strip and wash the sheets. Remake the bed. Use furniture movers to make changing the linens easier.

Our 20 day count down to a clean holiday will start in the guest room. Why start here when so many other areas need attention?  Because the room your guests will pay the most attention to is the room where they sleep. There, they can look around without any inhibitions so it’s really important to get this room extremely clean when making your home ready for guests. The first thing to focus on is the bed.

How to wash your bedding:

Make sure the sheets are clean and stain free. If they look at all worn or off color – spend the extra money and buy a new set.  Nothing looks more inviting than freshly laundered sheets! This includes the pillows and the pillow cases. No one wants to sleep on a pillow that looks or smells like it’s been on the bed for decades. Wash the pillows and remove the stains with my miracle pillow stain remover.  Watch the video below:

How to make your bed:

Make the bed starting with a fitted bottom sheet. Using a flat top sheet, place the pattern facing down so your guests pull down the sheets they’ll see the pattern on both sheets. Use hospital corners to keep everything nice and tight. Place a blanket over the top sheet. Fold down the top sheet about 4” so that the pattern will show and go over top of the blanket.  Top off the bed with a clean, fresh bedspread. Add a down comforter at the end of the bed to give your guests comfort options at night. An easy holiday cleaning tip is to use decorative pillows to make the room look inviting and up to date.  Add a big empty basket near the bed to give decorative pillows a special place during the night. Spray the bedding with witch hazel infused with your favorite essential oils to add safe and inviting fragrance to the room to put the finishing touch on your holiday clean up in the guest room.

Keep watching our blog for more holiday cleaning tips throughout the month!

Holiday Clean Up: 20-Day Challenge

Getting ready for a Holiday event doesn’t need to be stressful, it just takes a little extra planning. The Holiday Clean Up 20-Day Challenge is a step-by-step cleaning guide for the three most visible rooms during a party or dinner.  It’s simple to follow: each day there is one assigned task.  Follow this cleaning guide and, in just 20 days, your home will be perfect for all your holiday entertaining.

Click on the image above to download the Holiday Clean Up 20-Day Challenge cleaning guide.

And, you can access this PDF for a more detailed, text version.

There's also a companion blog, about super-quick short cuts to use when company's coming over last-minute, called Holiday Cleaning Hacks.