Tag: Leslie Reichert

How to clean and control mold

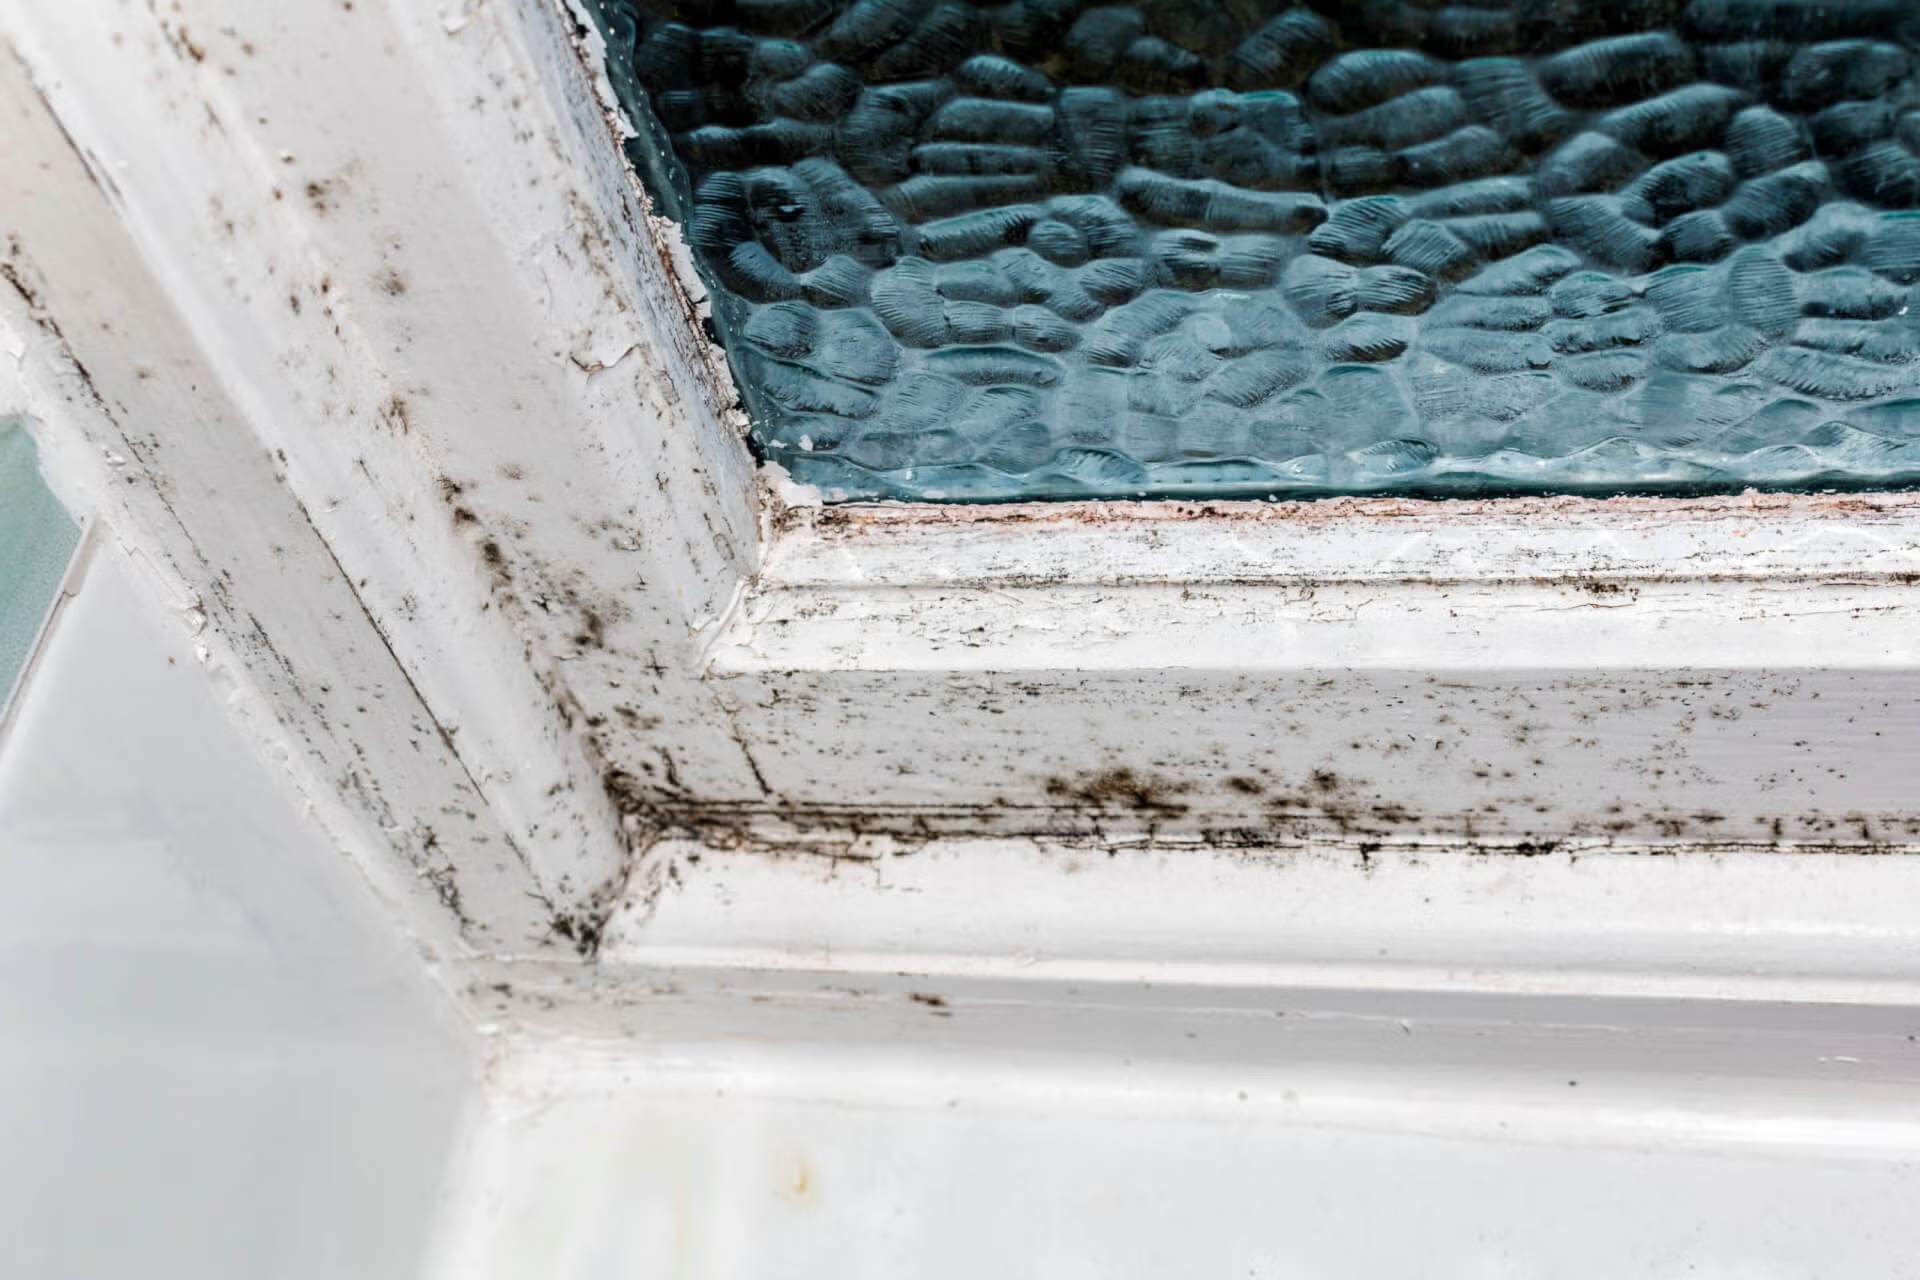
Almost every house has a little mold in it somewhere. Mold grows when you mix moisture and darkness. Mold actually uses your home’s plaster, drywall or wood as it’s food. And it destroys its food source as it grows. Address mold early, when tiny spots just appear, and remove it as soon as you find it so it doesn’t create a larger problem and potential damage your home.

Removing mold from your home

  • Before trying to remove mold from your home, make sure no one in your family has an allergy to mold. Some molds can be highly toxic and can cause a severe reaction. If you have any reservations about removing the mold in your home, consider calling a professional mold expert to handle the job.
  • Look for mold in damp, wet or steamy areas. This areas can include bathrooms, kitchens, flooded areas, basements, cabinets with plumbing leaks, garages or outdoor areas in humid climates.
  • Remove all the contents of the affected area and place them in sunlight to dry up the mold spores that may be on the items.
  • Mix up a bucket or spray bottle of oxygen bleach and water. Oxygen bleach will kill mold and bacteria just as well as chlorine bleach. Plus, it’s safer to use and won’t affect your respiratory system. Mix a few tablespoons of oxygen bleach in hot water until it’s dissolved.
  • Using a microfiber cloth, wipe all the items that were in the moldy area with the oxygen bleach solution. Place the item back into the sunlight to dry. If there are a lot of mold spores on some of the items, use a mask to protect yourself from the moldy dust.
  • Once the area is emptied and any affected items are clean and dry, use the oxygen bleach solution to wipe the visible mold off of any hard surfaces in the room. If it’s easier, you can put the oxygen bleach solution into a spray bottle and spray the areas. Let the oxygen bleach solution sit on the areas for 10-15 minutes. Then wipe the areas with a clean damp microfiber cloth. Once wiped clean the area needs to dry completely. Use a hair dryer for small, tight areas or use a room fan for larger areas. You also want to keep a window or door open to the outside to let fresh air into the area.
  • When the area is completely dry, spray the surfaces that were affected with mold with a mixture of witch hazel and 15 drops of Tea Tree oil. Tea tree oil is a natural essential oil that not only kills mold but also kills the mold spores that may be left in the surface. If the spores are not terminated, the mold will reappear. Tea Tree oil is a great option for removing the spores from the area naturally. Let the Tea Tree solution dry completely on the surface. It does not need to be wiped off after spraying.
  • If you have a severe mold problem in a bathroom or kitchen area, consider using a mold inhibiting paint primer on the surface. There are a number of primers that are available on the market. Some manufactures say that you can paint right over the mold, but most recommend removing the mold before painting the affected area. Painting the primer on the cleaned surface will prevent the mold from returning. These primers contain an EPA recommended antimicrobial ingredient that prevents the growth of mold, mildew and other fungal organisms. These primers can be found at your local hardware or paint store and can even be tinted to match your existing paint.


For more information on how to clean and control mold, see these posts:

Battling mold in your bathroom

Natural ways to kill off mold and mildew


For more information on green cleaning, visit Leslie Reichert's site: Green Clean Coach.

How to clean the garage

a two car garage in an urban area

Summer is a great time to swim, grill and clean the garage. That’s right – summer is the best time to clean out and organize your garage. If you wait until the fall, you’ll be fighting with bad weather and falling leaves. So look at your calendar and set aside one afternoon in the next seven weeks which will be WHEN you clean out your garage. Read below to learn HOW to clean the garage.

Empty

Start by removing your cars and all the other large equipment. Move all mowers, blowers and paint cans to the driveway or the yard so you can get into the corners and also clean behind shelves and storage areas.  Clean the large items as they come out of the garage. There’s no point to clean the garage just to put dirty items right back into it.  Use the blower on a low setting to remove dust and dirt from smaller things.  Use your hose to clean off the mower and other large items and for stubborn dirt then, let these items sit outside to dry off while you do the next steps.

Purge

While cleaning out the garage, put items that need to be thrown out into separate piles.  Make sure all flammable and toxic chemicals are kept in a pile that can be taken to a recycling center. If you don’t know where to take these types of items check out Earth911.com, where you will find a recycling solution for every item in your garage.  Be very careful when packing your car with hazardous waste. You want to avoid any potentially dangerous spills while you are transporting it to the recycling center.

Clean

Once the garage has been cleared out, it's time to clean. Start from the ceiling and work your way down the walls.  You can use a shop vac to clear out spider webs and dirt. Don’t try blowing the dirt off the ceiling or the walls until you’ve first used the vacuum to avoid blowing insect eggs or other nasty things (mice droppings) around the garage. Instead use the floor attachment of your shop vac and vacuum the ceiling and the walls.  This will pull dust off the walls and make it easier to deep clean them.

The floor

Clean the floor with the shop vac instead of a broom. A broom will stir up the dust and dirt and leave it back on the walls. Using a vacuum will avoid this problem. If the floors are extremely dirty, move this step in front of cleaning the walls and ceiling. Use your blower on a low setting and blow the large debris out of the garage.  There’s no point in vacuuming the walls only to stir up more dust and have to redo them.  Spot wash the floor with a degreasing soap or even a dish soap mixed with rubbing alcohol. The alcohol will work to break down the oil and the soap will wash it away.

Deep Cleaning

Once the ceiling and the walls have had the large debris and dust removed, use a damp microfiber mop head on the end of the mop to deep clean them from bottom to top. (NOTE: The direction is very important. If you wash walls from the top down, you risk staining your walls when the dirty water from the top of the walls runs over the dry lower wall. But if you wash from the bottom up, the lower wall will already be damp and surface tension will prevent the wall from absorbing any of the dirty water pulled down by gravity when you wash above.)

The microfiber mop head will work to pick up any leftover dust left by the shop vac.  Rinse the head out frequently or buy additional heads so you don’t have to bother rinsing the microfiber covers out when they get dirty.  Let the walls dry completely.

clea-the-garage-with-microfiber-mop

Organizing

Before putting items back into the garage, separate them into categories.  Keeping similar things together makes them easier to find.  For example, keep all your gardening items together and close to the lawn mower.  This way you will have an area of the garage where you know you should look when you are needing to use something.  Here are some of the categories you will use to organize your garage. These tips are the same as we shared in our blog article about cleaning out your garage before moving.

  1. Tools - gather all your tools together and organize them by size. Remove any duplicates and keep only the good quality tools.
  2. Outdoor furniture - make sure all your outdoor furniture is clean and free from mold and mildew before you store it in the garage. Use a blower to remove the dust and dirt or give it a good scrubbing with hydrogen peroxide if it has mildew spots.
  3. Camping equipment – camping equipment should be cleaned and dried before storing in the garage. Use sunlight to remove stale smells and store it only after it’s completely dry.
  4. Sports equipment – bikes, scooters and skateboards should be stored together. Smaller items like balls and gloves should be placed in plastic containers with lids and labeled on every side.
  5. Hardware – smaller items such as paint brushes, tools and maintenance items should also be placed in plastic bins with lids. Put a label on all four sides and on the lid so that you will know what’s inside. I highly recommend using clear, stack-able tubs in the same size.
clean-the-garage

For more great DIY cleaning tips, visit Leslie's site: greencleaningcoach.com

Cleaning and conditioning wood furniture and floors

white stairs with dark wood guardrails and treads

When was the last time you “fed” the wood in your home? In reality, we can’t feed any wood unless it’s still living as a tree. But the term refers to adding moisture to the finish of a piece of furniture. Your home’s climate, along with the amount of light, can dry out and damage the finish on your furniture. Even though manufacturers have conditioned us to believe that furniture needs to be cleaned and waxed, the goal really should be to keep our wood furniture and floors free from dust and put a protective coating on it to help the wood retain moisture. If you've ever wondered about cleaning and conditioning your wood furniture and floors, read on.

Cleaning the wood

We’ve been told to avoid using water on our furniture, but a damp cloth with a gentle soap won’t hurt the finish or the wood at all. Cleaning and conditioning wood furniture annually will keep the dust and dirt from damaging the finish as well as keep it from building up in the cracks, corners and indents of the wood.

Start with a soft rag like a cotton baby diaper or t-shirt. Place a few drops of a gentle hand soap in a bucket of warm water. Use just a few drops of soap to help lift off the dirt and grime. Place the rag in the soapy warm water and wring it out really well. Start at the bottom of the piece of furniture and work your way up. Working in this direction will help protect the wood from water streaks.  Use a gentle brush to get into cracks and tight curves on the piece. You can also use a toothpick or a knife covered over with the rag to get into tight places.  Rinse the rag in plain warm water and wring it out really well again, then rinse the soapy film off the wood. Dry the piece completely using a microfiber cloth.

Conditioning the wood

Now that the piece is completely clean and dried, you may want to add a sealant to the surface to keep it looking it’s best. Most furniture manufacturers recommend avoiding furniture polishes that contain silicone or oils.  Silicone sprays tend to give you a shiny finish, but leave the surface oily which doesn’t absorb into the wood.  Oils tend to attract dust and they can mix with the dust and leave a foggy film on the piece of furniture.

cleaning-and-conditioning-wood-furniture

Another rule of thumb is to never put a wax on an oil based finish. A simple way to remember how to add a sealant is oil on oil, wax on wax. It may take a little investigation to figure out the type of finish you are treating, especially if it is a vintage or antique piece. Most newer furniture and cabinets have wonderful finishes that actually can just be wiped with a damp rag, with no need to worry about ever “conditioning” it.

Conditioning wood floors

Cleaning and conditioning wood floors should also happen on a regular basis. The best way to clean a hard wood floor is with a microfiber mop and a spray bottle of water.  Start with a dry microfiber mop cover and lightly spray the floor with a mist of water. Using the dry mop, go over the area with the microfiber pad. It will pick up dust and leave the floor looking as clean as glass.

cleaning-and-condioing-wood-furniture-and-floors

If hardwood floors look dull after this process, the floor finish is damaged. Before addressing this problem be sure you know what your wood floors are made of - the varied materials and finishes available today call for different treatments. Know what you are dealing with because damage to the surface could be expensive to correct.

Some great finishes are available to put the shine back on your floor. Eventually finishes will wear off so they need to be re-applied on a regular basis.  A number of high quality manufacturers make a liquid floor wax for hardwood floors.  The floors should be cleaned and prepped per the directions and after the wax is applied, must be avoided for 24 hours.  The shine can last up to a year depending on the foot traffic in the room and the type of cleaning products used to clean the floor. It’s an inexpensive way to bring the shine back to your hardwood floors.


If this blog was useful, you may also like:

My Favorite Wood Polish

Do you know how to deep clean woodwork?


And, check out Leslie's website: greencleaningcoach.com 

How to care for a swimsuit

four kids smiling at the camera from the edge of a pool

With the official start of summer outdoor pools are starting to warm up enough to enjoy splashing around in the water.  It also means a look at how to care for your swimsuit so it will last through this season and beyond.  Without the right care, even a high quality swimsuit may not make it through one swimming season.  Here are some do’s and don’ts for caring for your swimwear.

Do wash your new bathing suit in cold water before wearing it the first time. The cold water will set the colors in your suit and keep it looking new. Chlorine and the sun will work to fade the colors so this one simple step can protect your suit from fading all season.

Do wash your swimming suit out every time you wear it. Even if you didn’t go in the water, your body oils and sun tan lotion can damage your suit.

Do use an outdoor shower and wet your suit before going into the water. A dry bathing suit is extremely absorbent and will act like a sponge, absorbing all the chemicals in the water. A wet suit is less absorbent and won’t get as much of the chemicals into the fabric.

swimsuit-care

Do rinse off after swimming in a cool outdoor shower so you can rinse off as much of the salt or chlorine as you can. Then store your suit in a plastic bag until you can get home to rinse it out and let it soak.

Do hand wash your suit instead of using the washing machine. Machines are too hard on a swimming suit and pull on straps and openings that break down the elastic.  Instead, turn your swimsuit inside out and place it in cool water with a gentle hand soap for 30 minutes to let the soap work to break down body oils and other chemicals.  Rinse out the suit with warm water and roll your suit up inside two clean, dry towels to remove the water. Then place it on a flat surface to dry.

Do use a simple technique of sprinkling corn starch on any spot or stains on your suit before soaking. Corn starch is very absorbent and will work to pull lotion or oils out of your suit so they won’t stain. Just sprinkle the area with the corn starch and let it sit for 30 minutes before rinsing it off.

Do use a drying rack to dry your suit. Don’t place your suit on wood or metal as those materials can catch the fabric or leave a rust mark. Invest in a drying rack that you can put in your bathtub or outside on a deck.

Do use a lingerie bag if you HAVE to wash your suit in a washing machine. The bag will prevent the straps and strings getting caught on other items and prevent the fabric from being pulled out of shape. Make sure you don’t put the suit, even in the lingerie bag, into the dryer.  The hot temperature will dry out the elastic in the suit.

Do look for chlorine resistant fabric when purchasing a new suit. This new fabric can make your suit last 25 times longer than a typical swimsuit.

care-for-swimsuit

Do purchase two swimsuits for your summer season. Having the ability to switch suits gives the fabric time to “remember” and go back to its original shape.  Most swimsuits are made with some Lycra in the fabric. Lycra has a memory so giving it a day off will help it go back to its original shape.

Don’t use a laundry detergent when washing your swimsuit. Use a very gentle soap that will rinse totally out of the fabric. A simple bar of soap will do – run it under the water so it’s dissolved in the water before you add your suit. Remember to let it soak for 30 minutes so the soap can break down the oils and remove the chemicals.

Don’t let your swimming suit sit in the soaking solution for longer than 30 minutes.  The chemicals will go into the soaking water during the 30 minutes, but after that you are just letting the suit sit in the chemicals you are trying to remove from it. To avoid this chemical cocktail, rinse it out after 30 minutes.

Don’t wring out your bathing suit. The intense pulling will break down the fabric and the elastic. Use the towel method mentioned above.

Don’t hang your suit over a rod or deck railing to dry.  The water that pools at the base of the fabric will pull and stretch the fabric so that it will become distorted. Always let your suit dry on a flat surface.

Don’t dry your suit in the sun. The sun is very powerful and will fade the colors and dry out the elastic fabric in your suit.  Instead, find a shady spot for a drying rack so you can lay your suit flat. Turn the suit over after the top feels dry to let the air get to the underneath.

Don’t sunbath in a wet bathing suit.  A wet bathing suit has the chlorine or salt in it and when those items are exposed to direct sunlight the damage to your suit is multiplied. Instead, sunbath first and then go swimming or use an outdoor shower to rinse off before laying in the sun.


How to clean pillows and bedding

women happily sleeping in a bed

Don’t you just love the feeling of clean sheets?  Crawling into a nice clean bed after a long day can be so relaxing.  When I was little, my mother ALWAYS washed our bedding on Mondays and Monday night was so much fun. I used to crawl into to bed and tell my mom the sheets felt “sugary”.  I’m not sure where “sugary” came from but I do remember they felt wonderful.  Don’t you wish you could have that wonderful feeling every night?  I remember reading somewhere that Oprah has clean sheets put on her bed every morning. Oh if only….

Instead of talking about the “how oftens” of cleaning our bedding, let’s focus on the “hows”.  There are two different types of cleaning for bedding: the standard weekly washing and the seasonal cleaning done every two to three months.

how-to-clean-your-pillow

Pillows

Our poor pillows take a real beating – literally.  We punch them during the night and shake them out the next morning. And we don’t want to even talk about the drool and dust mites inside of them.  Down pillows are wonderful to sleep on but not if you have allergies, because they also hold onto dust mites and the mite dander. That’s not a good scenario when you are allergic and spending eight hours with your head on that pillow.  A simple solution is to place your pillows in the dryer for 10-15 minutes on very high heat. The heat will kill the dust mites and shake out the dander.

Wash your pillows once a quarter to remove dust, dander and dust mites. If you have gruesome stains that have accumulated on your pillows, try this DIY recipe for removing stains and cleaning your pillows so they are lovely and fresh. Sugary, even.

Miracle Laundry Whitening Formula (for a top loading washing machine)

¼ cup powdered automatic dish washing detergent

¼ powdered oxygen bleach or liquid chlorine bleach

¼ borax

¼ liquid or powder laundry soap


Dissolve the powdered ingredients in 1/3 cup boiling water (boil in a microwave safe container until it reaches a full boil). Mix in the liquid ingredients and add the entire mixture to the water in the washing machine before placing the pillows in the water. Make sure the entire mixture is evenly distributed in the water. Wash at the hottest water setting and the highest spin cycle. Remove and place the pillows in the dryer with four dryer balls to make them dry faster and come out of the dryer nice and fluffy.

how-to-clean-sheets

Sheets

Most experts (including myself) recommend washing your sheets on a weekly basis. If you have two sets of sheets, you can take off the dirty sheets, replace them with the clean ones and wash the dirty sheets at your convenience. If you deal with dust allergies, wash the sheets in the hottest water possible and dry them in the dryer on a hot setting. The hot water and the hot air will kill the dust mites and remove their “dirt”.  Hanging sheets outside is not an option if you are dealing with allergies because dust and pollen will aggravate allergies. Instead, get that “fresh” smell by using a DIY linen spray.

DIY Linen Spray

2 cups witch hazel

12 drops of an essential oil in your favorite fragrance

Mix the two ingredients in a 16-ounce spray bottle. Set the spray nozzle to a light mist. Mist the linen spray over your sheets and pillows and let dry. The oil will make your sheets smell like they were dried outside.

how-to-clean-down-comforter

Comforters

Put comforters in the dryer on a weekly basis to refresh and remove any dust that’s accumulated on them. Since they are fabric they attract and hold onto dust just like carpeting.  Use the dryer's cool setting to fluff it and remove the dust. Dealing with dust allergies?  Set the dryer on the hottest setting and leave the comforter in the dryer for 10 – 15 minutes. The heat will kill the dust mites and the tumbling action will remove the dust mite allergens.

Once a season, wash your comforter (if it’s washable) or have a local dry cleaner launder it, preferably without chemicals. Most dry cleaners are very accommodating and realize that people don’t want the harsh chemicals used on their items unnecessarily.

For DIY cleaning, use a gentle soap that will rinse totally out of the comforter and the batting. Fill the washing machine with water and place the soap in the water for even distribution. Never put the soap directly on the comforter.  Place the comforter carefully in the washing machine and make sure everything is balanced. After it’s gone through the wash and spin cycle, place it in the dryer with six dryer balls to help it dry quicker. If it’s a warm hang it outside, then bring it in and finish drying it in the dryer to remove any dust or pollen.

If you liked this post you may also like:

How to clean window blinds and shutters

How to clean curtains and window treatments


Leslie has more green cleaning tips. Check out her site.

How to clean window blinds and shutters

a women peering through blinds

Blinds and shutters are the perfect accents for your windows.  To keep them looking as nice as the day they were installed, clean them on a regular basis. The secret is all in the frequency.   A light dusting once a week will keep shutters looking brand new. But skip a few weeks, and the dust will build up and combine with the moisture in the air and make it difficult to remove.

Here's all the info on how to clean window blinds and shutters, whether they are brand new or not-so-new and kind-of-yucky. Follow these cleaning tips throughout the year, especially if there are asthma or allergy sufferers in your family.

Weekly Blind Cleaning

During your weekly regular cleaning, lightly dust all blinds and shutters.  Adjust blinds to the closed position and use a dry microfiber cloth to wipe them down completely. If the blinds are getting dusted every week, the microfiber cloth will do the trick to keeping them clean without using any cleaning products.

Deeper Cleaning

If your blinds have a buildup of dust and dirt, there are a few things you can do to make the task of cleaning them a bit easier. Start by putting the blinds in the downward position and use the upholstery attachment of your vacuum just to remove any large debris accumulated on the blind. While in the closed position rub a large looped microfiber cloth vigorously over the slats of the blind. Remove as much of the buildup as possible by putting pressure on the slats. Finally, using a spray bottle of rubbing alcohol, spray a light mist on a clean microfiber cloth and work it over the slats. The alcohol will work to cut through the buildup of dirt without turning it to a muddy mess. And the alcohol will dry quickly so it won’t drip down onto the next blind or onto the floor.

Deepest cleaning

Really grimy blinds or shutters will have to come down. If only there were some easy cleaning tips for yucky blinds, but there aren't. Fill a bath tub full of warm water and add a few drops of your favorite dish soap and two cups of distilled white vinegar to the water.  Let the blinds sit for five to ten minutes in the solution to loosen the buildup.  The natural acid in the vinegar will work to break down the dust and the soap will help to lift it off.  Gently rub a sponge over the slats to remove dirt. A small stiff brush will work to get into tight areas.  Rinse the blinds twice in clean, cool water. Let them drip dry for a few minutes then wipe them dry with a microfiber cloth.

Other types of blinds

how-to-clean-window-blinds-wood

Wood Blinds – Wood blinds should not be immersed in water as the moisture will warp them. Avoid using polish or oil on wood blinds as it will attract more dirt to the slats and make them more difficult to clean. Instead of a polish, use a spray bottle of witch hazel to spritz a light mist onto a microfiber cloth and wipe the slats clean.

Vertical blinds – Vertical blinds should be dusted or vacuumed but never submerged in water as the blind will separate from its backing. Use a dry microfiber cloth to remove dust on either side of vertical blinds on a weekly basis. Once a month use the upholstery brush and work over each of the slats to remove deeper dust and dirt. If your vertical blinds get a buildup that your vacuum can’t handle, call a professional blind cleaner to have them deep cleaned.

Exterior – Outside blinds or shutters can be dusted with a soft brush on an extendable pole. Or, wash with a hose and stiff extendable brush.

A word about the tools used to clean window blinds and shutters

Microfiber large-looped cloth – to wipe over the blinds so it will catch the dust and hold onto it until you put it into the washing machine.

Microfiber dusting wand – to reach the top corners of the blinds that are difficult to reach.

Microfiber dusting glove – to capture and remove dust on the slats and hold onto it until you place the glove in the wash. There are two types. One looks exactly like a driving glove and the other like a mitten. Both work well.

Paint brush – to clean off dust and dirt in hard to reach places on your blinds. They’re inexpensive at the hardware store so purchase different sizes to get into different areas.  Wash with warm water and a drop of dish soap. Air dry before re-using.

Blind cleaner brushes – supposed to be very convenient to dust the individual slats but these tong-like tools, hawked on late night TV, are cumbersome and time-consuming to use. It takes a lot of patience to get the tool lined up with the slats on the blinds.  A microfiber cloth or a microfiber glove to remove the dust is the way to go.

Vacuum attachments – to remove cobwebs and larger debris on blinds. Also cumbersome for dusting and other than the big stuff, microfiber cloths and wands are easier to manage and very effective.

clean-window-blinds

Now that you know how to clean window blinds and shutters, you'll be able to keep them looking great whether closed for privacy or open to let the sun shine in.


If you liked these cleaning tips, check out some others that are super useful this time of year:

How to Clean Summer Stains

How to clean the gas grill

How to clean a clogged drain, the GREEN way


For more information from our DIY green cleaning expert, Leslie Reichert, go to greencleaningcoach.com


How to Clean Summer Stains

young kid eating a melting ice cream that is creating a mess

Along with the sunshine, warm temperatures and (slightly) relaxed pace we also greet a set of summer stains along with the summer solstice. Not all stains can be treated the same way so don’t reach for the stain stick unless you know what’s in your stain.  Here’s a rundown on how to handle the TOP 10 summer stains PLUS a printable guide to put in your laundry room so you have the information at your fingertips. Our guide on how to clean summer stains should be required reading 🙂

download-free-stains-of-summer-guide


Ketchup – If the ketchup has dried, brush off as much as you can with a stiff brush.  Soak the stain in warm water for 30 minutes. Then, using a bar of Ivory soap, work the soap into the stain with a toothbrush. Continue to work the soap into the fabric until you can no longer see the stain.

Mustard -Dampen the stain with warm water and then apply a liquid laundry detergent on the area. Leave undisturbed overnight and rinse in the morning. If the stain does not come out, repeat the process or try a stain remover. You can also put the stain in the laundry with some oxygen bleach to see if that will remove the stain.

Dirt – Start by soaking the stain in cool water with a small amount of dish soap and some distilled white vinegar. The acid in the vinegar will break up the stain and the grease cutting properties in the dish soap will work to loosen the stain from the fabric. Use a toothbrush to separate the stain from the fabric with gentle brushing. Rinse and repeat this process if necessary.

hohow-to-clean-summer-stains-pizza

Pizza Sauce – First dampen the area by patting gently with a wet cloth. (Don’t pour water over the stain as it will bleed into the surrounding fibers.) Place a few drops of liquid automatic dish detergent (the type used in the dishwasher) directly on the stain and rub it in with an ice cube.  If there is a stain left after rinsing, blot with a rag soaked with distilled white vinegar. The acid in the vinegar will cut through the stain and loosen it from the fibers. Use a toothbrush to continue to try to remove the stain from the fibers. Rinse and repeat until the stain is gone.

Iced coffee – Run cool water through the back of the clothing to flush the stain out through the front. Flush fabric for 5 minutes. If the stain is still visible, spray the area with club soda and let it sit for 10-15 minutes. If the stain persists, dissolve some powdered oxygen bleach in warm water and spray it over the area. Use a stiff brush to work the oxygen bleach into the stain. Let it sit for a few minutes and then rinse. Let the entire piece of clothing air dry. Another cleaning tip: if the stain is still visible, apply real lemon juice to the stain and set the piece of clothing in the sun. The natural bleach in the lemon will work with the sunshine to bleach the stain away.

Grass – Grass stains are removed by pre-treating the stain with a stain remover.  Dampen the area with cool water to start and then apply the pre-treatment to the stain. Let it sit for 10 – 15 minutes before putting the clothing in the laundry. Do not put the item in the dryer. Instead let it air dry and check to see if the stain is gone. If not, repeat the process above.

Oil – Oily stains can be removed with rubbing alcohol and a basic bar of soap. Start by applying the rubbing alcohol directly to the dry fabric. Work the alcohol in with your fingers or a washcloth. Once it’s worked into the fabric, let it sit for 10 to 15 minutes.  The alcohol will work to break down the oil.  Next take a basic bar of WHITE soap and work the soap into the stain. Add a few drops of water to create a lather.  Rinse the area with warm, not hot water. Let the item air dry and check to see if the stain is gone. Repeat this process until the stain disappears.

Chocolate Ice cream – Scrape off as much of the ice cream as possible. Blot the area to remove any excess chocolate stain. Do not rub the area or you will push the stain further into the fabric. Flush the stain out of the clothing by running warm water through it from back to front.  Once most of the stain is removed add a few drops of laundry detergent to the spot and work it into the stain with your fingers.  Let the detergent sit for 10-15 minutes and then rinse the detergent from the spot. Let the item air dry to see if any of the stain remains. If so, repeat the process above.

clean-summer-stains-sunscreen

Sunscreen – Remove as much of the sunscreen as possible from the area with a knife or spoon.  Sprinkle the area with corn starch to absorb the oil in the sunscreen.  Let the corn starch sit for 30 minutes and then brush it off of the fabric.  Use a cotton ball or Q-tip and apply rubbing alcohol to the stain. Let it sit for 10 – 15 minutes. Then use a few drops of dish soap and work it into the stain. Flush the area with warm water from the back of the fabric and let it air dry.  Repeat the process if any of the stain is still visible.

Sangria – Immediately after a spill, spray the stain with club soda and cover the area with salt. The salt will start to absorb the wine. Once the guests are gone brush off the salt and dab the area until the cloth comes away clean. Then treat the area with hydrogen peroxide. Be patient – it takes the hydrogen peroxide awhile to work, but you will see the stain disappear before your eyes.  Alternatively, soak the fabric in warm (not hot) water and hydrogen peroxide until the stain is gone. Air dry the item to make sure the stain is completely gone. Repeat this stain removal procedure until the stain is entirely gone.

Hopefully having these cleaning tips will help you enjoy the season as much as possible. Because it's a time to collect memories, not summer stains!


If you enjoyed this article, you might want to check out How to Clean the Gas Grill.


For more info on Leslie Reichert, visit greencleaningcoach.com

How to Take Care of Your Mattress

young child jumping on a bed

When you look at the things in your house that need attention this spring, do you see your mattress anywhere on the list? Probably not, and you’re not alone. Few people realize how important mattress care is – not only to your spine and sound sleep. Respiratory health depends on it, especially if you have asthma or allergies.

Most people don’t know that mattresses actually need to be cleaned every season, not just in the spring. Read this blog to learn all the little-known tips for how to take care of your mattress.  And, some things you should definitely NOT do if you want to properly take care of your mattress.

Do you know what you’re sleeping on?

Before you start you need to know exactly what type of mattress you own.  There are many different types of mattresses on the market. And each type needs a different care routine.

FOAM – Foam mattresses are made from many different types of foam that are used in combination to create different densities for comfort and support. Foam mattresses are easy to care for: simply spot clean stains with an ecofriendly spot cleaner and vacuum it on a regular basis to keep allergens to a minimum.

GEL – If it is made of gel, care for your mattress just like you would a foam mattress. Keeping it aired out and vacuumed is very important.

INNERSPRING – These mattresses are usually covered in a fabric which absorbs moisture and dust. Vacuum innerspring mattresses on a regular basis to maintain a healthy sleeping place and easy breathing.  Using a mattress cover will keep your mattress free from stains, dust and moisture. It is a worthwhile investment to help you take care of your mattress.

how-to-care-for-your-mattress-vacuum-regularly

Mattress Do’s

  • Turning your mattress on a regular basis distributes wear evenly. You should turn the mattress from side to side and also from top to bottom. Turning should be done once every three months to prolong the life of the mattress. Do not flip your mattress.
  • Vacuum your mattress every time you change your sheets. Use an upholstery tool on your vacuum to vacuum the mattress top and sides as well as the mattress frame.
  • Let your mattress air out as often as you can. When changing the sheets, it makes sense to strip the bed in the morning and let the mattress air out during the day. We sweat a lot while we sleep and our mattresses absorb that moisture. Giving it time to air out and dry will keep it fresh. Martha Stewart suggests stripping the bed before going on vacation so that the mattress can air out all week.
  • As necessary, spot clean mattresses with a gentle spot cleaner. Use extremely diluted dish soap (a drop or two is all you need) in a 16-ounce spray bottle and a microfiber cloth to spot wash dirty areas.
  • Invest in a mattress cover to keep your mattress clean and free from moisture. A mattress cover can also seal in allergens so that you won’t be affected by dust mites and their “dirt”. Do your research and choose a mattress cover that will repel water and seal in allergens.
how-to-care-for-your-mattress-don't-jump-on-the-bed

Mattress Don’ts

  • Don’t let your mattress get wet. Moisture in a mattress takes a long time to evaporate and can actually cause a mold problem. If the mattress does get wet, you can sprinkle corn starch on the area to absorb the moisture and then let the mattress air dry.
  • Don’t sit on the edge of the bed. The pressure and weight of your body will work to break down the sides that support the mattress.
  • Never use harsh chemicals around your mattress. Your mattress is like a huge sponge and the fumes from the chemicals will stay inside it for a long time, exposing you to those chemicals while you sleep.
  • As much as we think it’s okay, don’t put a board between the mattress and box springs. This will work against the support system in your mattress.
  • No more jumping on the bed. This damages the mattress (plus it’s unsafe!) so no more jumping on the bed during pillow fights.


For more information on cleaning for Asthma and Allergies, visit:

https://maidbrigade.com/blog/choose-the-best-vacuum-cleaner
https://maidbrigade.com/blog/how-to-clean-books-and-bookcases

For more green cleaning tips from Leslie, visit her Green Cleaning Coach web site.


How to clean a clogged drain, the GREEN way

Clogged drains start off slowly with water taking just a touch longer than usual to go down the drain. Then one day the water stops moving. Hair and soap scum will slow down the water flow almost without notice. It’s best to address a slow moving drain before it becomes completely clogged so you aren’t dealing with a broken pipe or worse.  Most of us have been “taught” through advertising that all you need is a bottle of drain cleaner. But this option is extremely dangerous and the ingredients can hurt you and your pipes and it’s unnecessary to release these toxins into your city’s water system when there are safer solutions for you and the environment.  Green clean a clogged drain using one of these methods:

green-clean-a-clogged-drain-with-a-plunger

A plunger

It seems like a primitive way to clean out your drain but it’s one of the safest ways to remove a clog.  Make the first push of the plunger a gentle one. This will release the air inside of the tool. Now you can be more aggressive and push and pull the plunger to release the clog. After a few times, pull the plunger up and off of the drain.  You will see water from the clog come up and into the sink. If it doesn’t drain down, keep repeating the process until the clog is removed.

Drain weasel

There are some simple but very effective tools that will help remove solids that may be slowing down your drain.   The drain weasel works pretty simply. By using a patented micro-hook system on a flexible wand, it simply spins, pulls and toss.  It works faster than using a chemical drain cleaner.

A vacuum

Most wet/dry vacuums have a way to reverse the suction so that you can blow the clog out of the pipes.  Place the hose attachment in the exhaust area so that your vacuum is blowing air instead of sucking. Place the plastic pipe into the drain and let the pressure work to push the clog down the drain. Make sure you are very careful not to blow water and debris all over the room.

green-clean-a-clogged-drain-with-baking-soda

Simple Drain Cleaning Recipe

Your kitchen pantry holds ingredients that can green clean a clogged drain.  Mix up some table salt with an equal amount of baking soda and pour the mixture down the clogged drain. Then use one cup of distilled white vinegar that has been heated in the microwave. Pour the hot vinegar down the clogged drain and watch the mixture foam. Let the solution sit for 10-15 minutes while it continues to foam.  Flush the clog down with a pan of boiling water.

green-clean-a-clogged-drain-with-dish-soap

Dish Soap

Yes, dish soap can green clean a clogged drain! Place ¼ cup of dish soap down into the clogged drain.  The soap will work to break down the grease and loosen up the clog. Let the soap sit in the clog overnight.

green-clean-a-clogged-drain-with-a-drain-auger

Call a Professional

Instead of pouring an acidic solution down your drain that could make you sick and damage your pipes – call a professional. I have seen instances where you loosen a clog with the chemicals but it just moves the clog further down the drain pipes, creating an even bigger problem. A professional plumber will use a powered auger that can go for 200 or more feet to make totally sure your clog is removed from your drain pipes.

Green clean a clogged drain using any one of these methods instead of harsh chemicals that put your health, your pipes and the environment at risk.


Find more information from Leslie Reichert, our Green DIY Cleaning Expert, at www.greencleaningcoach.com

How to Really Clean a Fireplace

how-to-really-clean-your-fireplace

When was the last time you cleaned your fireplace? Not just emptied the logs and shoveled (you didn’t vacuum, did you?) the ash, but really cleaned it?  To clean a fireplace is not even a "to do" on our spring cleaning list. Surprisingly, your fireplace should be cleaned at the end of every burning season.  Chimneys also need to be cleaned and checked regularly by a professional chimney sweep every year to avoid a chimney fire.

If you follow these simple tips on how to clean a fireplace, yours can be cleaned in less than an hour.

Things you will need:

  • Stiff Brush
  • Abrasive tool
  • Protective clothing
  • A sheet or cloth to protect surrounding area
  • An old towel (one that is okay to stain)
  • Gloves
  • Coffee grounds – helps to keep ashes from becoming airborne
  • Kneeling pad
  • All-purpose cleaner
  • DIY stain remover
  • Fireplace shovel
  • Cream of Tartar
  • Distilled white vinegar
how-to-clean-a-fireplace

Start by laying down a tarp or towels around the fireplace to protect your flooring from soot. Make sure to wear protective clothing as soot is extremely difficult to remove from fabric.

Remove the grate from the fireplace while wearing protective gloves. Place the grate on the old towel to prevent soot getting on the flooring. Remove any large debris in the fireplace and throw away the large chunks of burnt logs.

Using a hand-held brush, start at the top of the of the fireplace and brush the loose dust from the walls of the flue.  A simple tip to keep ashes from becoming air borne is to sprinkle dried coffee grounds on top of the ashes. Remove the ashes and the grounds with a dust pan or a fireplace shovel and dispose in garbage bag.  Never use a household vacuum to clean up the ash. The ash in a fireplace will destroy a vacuum motor because vacuum bags are not designed to capture fireplace soot.  Alternatively, use a specialized vacuum designed specifically for ashes.

Next, spray an all-purpose cleaner on the walls and floor of the fireplace, and the exterior brick if there are soot stains on it. Let it sit for 30 minutes to let the cleaner absorb into the pours of the brick. The ingredients of the all-purpose cleaner will work to break down the carbon that is contained in the soot. After it sits, use a scrub brush to clean the brick.

If the brick is stained, clean it with a DIY stain remover made with Cream of Tartar and water. Mix the Cream of Tartar powder with water to create a thin paste. Use a tooth brush and scrub the mixture into the brick. Let the paste dry to a powder. Use a soft brush to remove the powder from the brick. The powder will pull the soot from the pours of the brick.  Another method is to spray the stained area with distilled white vinegar and brush the Cream of Tartar into the stain so that the acid in the vinegar will break up the soot.

Use a wire brush to remove burnt on creosote that has built up on the fireplace grate. Place the grate back into the chimney. Make sure to use dry wood in your fireplace to keep the buildup to a minimum.

Spring cleaning should always include the fireplace if you have one. And now you'll never have to wonder how to clean a fireplace the right way.


www.greencleaningcoach.com


How to choose the best vacuum cleaner for YOUR home

Someone I know has another friend who recently told my friend that she purchased the perfect vacuum and that my friend should buy one too.  Maybe it's happened to you too. Before we even think about the type of floors our friend might have, we look up that vacuum up on the internet.  But since none of us have the same home it doesn't make sense that we consider a vacuum for ourselves that is perfect for someone else.  Whether you realize it or not a vacuum is a very important appliance for your home. It deserves some thought and research before you buy it. Here are a few tips to help you chose the best vacuum cleaner for your home.

choose-the-right-vacuum-rugs

What type of vacuum cleaner do you want

Different personalities like different types of vacuums.  Upright people are pushy – meaning they like to push things around. They don’t like the idea of dragging something around behind them. Canister people don’t like the weight of an upright and prefer to just handle the pipe and hose. They don’t mind something following behind them. Decide which type of vacuum you prefer and shop for that style of vacuum.

choose-the-right-vacuum-canister

Is weight an issue

If you have a bad back or shoulder issues, don’t even consider a heavier vacuum.  But remember that the weight of the vacuum is directly related to the vacuum’s suction. Light weight vacuums are easy to use but don’t have very big motors. Heavier vacuums have large motors and great suction, but will be difficult for you to use. Decide whether you prefer a light weight vacuum or one that has great suction. Unfortunately, you can’t have both. At least not in the same unit.

choose-the-right-vacuum-for-hardwoods

The best way to clean hardwood floors

For hard wood floors, you might consider a canister vacuum. The soft floor brush that comes with a canister is the absolute best way to clean a hardwood floor. You won’t even need to use a dry mop after using this type of attachment. The bristles of the floor brush work incredibly well at picking up dirt and hair and will leave the floor looking perfect.

If you have allergies

Everyone loves the convenience and cost savings of a bagless vacuum cleaner, but think twice about purchasing one if you have dust allergies. Dumping the dirt container exposes you to concentrated amounts of allergens and dust mites.  You would need to use a mask and gloves to avoid being exposed to all those allergens. Another little known fact about bagless vacuums is that the filters need to be replaced every 6 to 12 months to keep them working efficiently.  This can cost up to $60 for each filter change, depending on the model of the vacuum. These costs are an important consider when you chose the right vacuum.

If you have pets

If you have pet hair, you need to have a very aggressive beater bar in your powerhead. Look for very stiff bristles on the beater bar along with incredible suction power to suck up the hair and dander in your carpet.

Stairs

The right vacuum for stairs should have a hose attachment that can reach at least ¾ of the way up a staircase. You don’t want to be fighting with a heavy, cumbersome vacuum while cleaning your stairs.

Reach

Manufacturers call this a “cleaning radius”. A canister vacuum can clean up to 35 feet from the plug in the wall. A vacuum’s cleaning radius should be something to consider before making your purchase. The information should be listed in the manufacturers details of the vacuum.  Nothing is more frustrating than finding your new vacuum won’t reach where you need it to clean.

HEPA filtration

If you deal with allergies, you want to choose a vacuum with a HEPA (High Efficiency Particulate Arrestance) filter.  You especially want a HEPA rated vacuum if you or a family member has severe dust allergies. The best HEPA vacuum has a sealed system meaning that there are no leaks in the entire system.  Watch out for the labels HEPA-type or HEPA-like.  These are vague ratings and don’t actually mean the vacuum is rated HEPA.  A real HEPA filter removes allergens down to .03 microns. The technical specifications on the vacuum will tell you the filter’s efficiency.

Research the repair records

Some manufacturers don’t even supply repair parts for their appliances. Do a little research on the different models you are considering. You don’t want to have to purchase a new vacuum just because of a minor (but un-doable) repair on your old one.

Your vacuum is an investment

Choose the right vacuum for your home. People spend more on a week’s groceries than they do on their vacuum cleaner. Yet they get frustrated when it doesn’t work correctly. There are quality vacuums on the market that will last decades for a small investment. These models are worth the extra money. You may save a few dollars with a disposable model, but over the years you will save hundreds of dollars by purchasing a good quality vacuum. And, your home will also be cleaner and your health better protected.


Leslie Reichert is a cleaning expert that uses her sparkling personality, great sense of humor and contagious passion to encourage her fans and followers to think differently about what they are using in their homes. Leslie is known as a Green Cleaning Coach and she is changing the world - "one spray bottle at a time".  She is a national lecturer, a frequent homekeeping expert on The Dr. Oz Show, Martha Stewart Living Radio, Maid Brigade’s DIY Cleaning Expert and author of the book: The Joy Of Green Cleaning- a handbook for DIY cleaners. She works with Better Homes and Gardens, Real Simple, Today.com and other national publications.  You can see more of her work at www.greencleaningcoach.com

How to clean pots and pans

how-to-clean-pots-and-pans

Unless you’re an over achiever in the cleaning department, it’s a safe bet your pots and pans need some attention. It’s really not your fault if they have black burnt spots on their bottoms – the heat on your cook top gets so hot that even water can leave a burn mark.  According to the 2017 Cleaning Calendar & Checklists Maid Brigade recommends special attention for pots and pans every three months.  But finding the time to clean your pots and pans is not always easy. That’s why it’s important to make sure you’re using the best methods so you don’t waste time.

Cast Iron

The beautiful thing about cast iron is that you can never really tell how dirty or stained it is. Cast iron has been around since the 5th century BC but cast iron cookware was developed by two American companies in the late 1800’s. The Lodge Company is still manufacturing their cast iron line today. Caring for cast iron is more about keeping the pan oiled than it is about removing stains. Cast iron will oxidize if left open to the air.

how-to-clean-cast-iron-skillet

Never use soap on cast iron as the soap will be absorbed by the pores of the pan leaving a soapy residue in the metal that will leech into your food. Use a steel or stainless scrubby to remove any burnt on food particles, then wipe the cook surface with a paper towel treated with olive oil to seal the pan and prevent oxidation. Clean cast iron every time it's used for cooking.

Store the cast iron in your cupboard and keep a paper towel on the cooking surface to keep the oil from getting on the bottom of your other pots and pans when you stack them.

Stainless Steel

Stainless steel is the choice of professional chefs because of its durability.  Stainless can really stand up to abuse but it does need some special care to keep it looking good. Use this amazing trick from celebrity chefs to help make clean up easier: always heat the pan before putting anything in it. When cold food is put on a room temperature pan, the cold causes the metal to contract and “hold on” to the food, making it stick. However, heating the pan first will cause the steel to expand instead, preventing food from sticking when it is added to the pan, working just as well as a non-stick pan.  After cooking, let the pan air cool and wash it in warm water with a gentle soap.

how-to-clean-stainless-steel-pots-and-pans

Don’t use anything harsh on the outside of the pan as it will scratch. Use a non-abrasive cleaner on the bottom to remove burnt on stains.

Water spots on stainless's shiny exterior are caused by minerals in the water. Remove them easily by using a cloth dipped in white vinegar. The acid in the vinegar will cut right though the mineral deposits that come from the dried water droplets.

Stainless steel can get rainbow-colored stains caused by over-heating. When this happens you will see a rainbow colored stain on the bottom or sides of the pan.  Remove those stains by rubbing some ketchup over the area and letting it sit for a few minutes before wiping the surface clean with a soft cloth. Clean stainless steel pots and pans this way every three months.

Ceramic

Ceramic bakeware should be treated with care. Ceramic must be left to cool completely before placing in water for washing.  Once the ceramic dish is cool, use hot water and baking soda to remove food that may be stuck to the cooking surface. Then, just wash ceramic bakeware in in warm soapy water. Clean ceramic dishes every time they're used, because baked on food will be harder to remove with each subsequent heating.

how-to-clean-ceramic-bakeware

Forged Steel

Forged steel cookware can be treated like cast iron even though it’s not as heavy or as porous as cast iron. The oils on the forged steel keep food from sticking. Scrubbing too hard will remove those oils, so don’t be too aggressive with the cooking surface. Simply keep it clean by washing it in warm water and a touch of gentle soap. Just make sure not to soak forged steel pots or pans in water.

Copper

Most people think copper cookware is extremely hard to care for but this couldn’t be further from the truth. The copper on the outside of the pot creates an excellent conductor for heat while the hard metal inside keeps the food from coming in contact with the copper. Copper pots are usually lined with a hard metal such as nickel, tin or stainless steel.  If using copper pans be sure to check the lining inside frequently, to make sure it’s in perfect condition and not wearing away.

how-to-clean-copper-pots-and-papns

When copper is exposed to air, it turns a lovely patina that can add to the charm of the pot. If you prefer it shiny and clean, use a natural acid like ketchup or vinegar to remove the patina. Do this every three months.

Aluminum

Aluminum pots and pans can be washed in warm soapy water. To remove stains, you can use a cut lemon or sprinkle cream of tartar on the stain and rub it in with a soft cloth. Then just rinse with warm water and dry with a soft cloth.

No matter what type of cookware you have, the real secret to keeping it looking good is to address burn marks and stains as they happen. A simple burn mark may come off easily when it first happens but if it’s not addressed, the pot will get put back on the heat and the burn is seared onto the pot. These stains are almost impossible to remove, so it's important to clean up burn marks and stains every time you use an aluminum pot.


Leslie Reichert is a cleaning expert that encourages people to think differently about their cleaning products. Leslie is known as the Green Cleaning Coach is changing the world - "one spray bottle at a time".  She is a national speaker, a frequent homekeeping expert on Martha Stewart Living Radio, Maid Brigade’s DIY Cleaning Expert and the author of the book: The Joy Of Green Cleaning. For tips and simple, but effective strategies visit her at www.greencleaningcoach.com